Human Design 101: How to Read Your Chart

How to Read your Bodygraph and Human Design Chart
There are so many layers to Human Design - the meanings and relationships of the gates depending upon which planets they reside, unconscious versus conscious etc.
All that aside let’s start at the beginning, with the components that DON’T change, no matter what.
What is Human Design?
Have you ever wondered what makes you stand out from everyone else? Human Design is like a beautiful blend of ancient wisdom and modern science, wrapped in a system that helps you discover the magic and raw power of who you were always meant to be.
Often called the “new Astrology” or the place where science meets spirituality, Human Design offers you a blueprint of your unique energy. Your chart is created using your birth date, time, and location, giving you insights into everything from your life path and work style to how you connect in relationships and experience energy in the world. At its core, Human Design is here to guide you toward living a life that’s not just authentic—but meaningful.
The most common question people ask about the chart is, “I don’t know my birth time, what can I do?”
More details about BIRTH TIME in another post HERE.
You can get your Free Human Design Chart, also called a BodyGraph HERE.
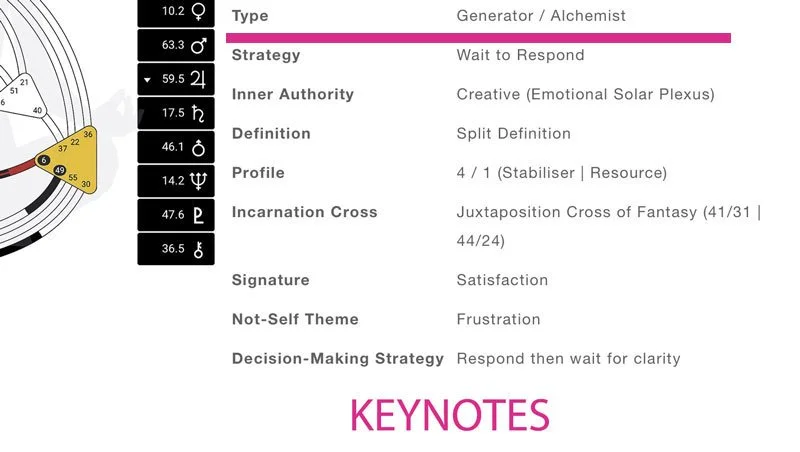
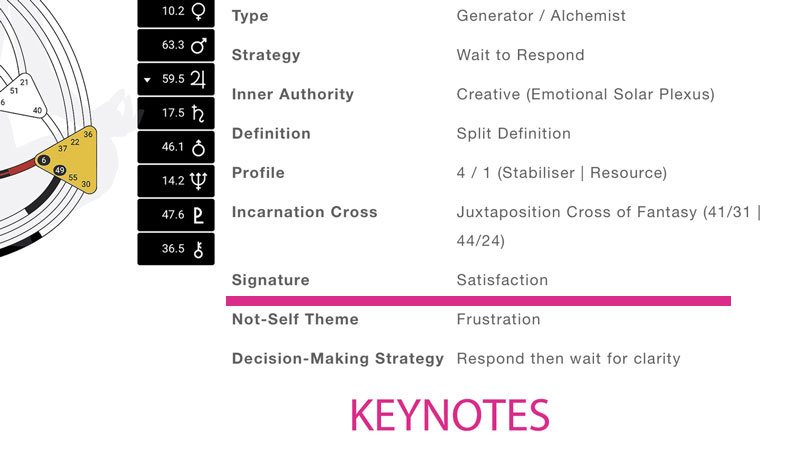
In the report results, at the bottom or the side (depends which software you use) of your Human Design chart, you will see a section called Keynotes, which is a short summary of the most important parts of your chart.

The keynotes tell you:
– your type and your unique decision-making strategy,
– your authority – whether you are spontaneous or whether you need time to make good choices
– your emotional theme – which emotion you may find most challenging in your life.
Your Human Design Chart Explained
When you’re just starting out, it’s helpful to think of your Human Design chart as having two main parts, though it’s always important to look at the big picture.
On the right-hand side, you’ll find a list of items that make up your chart. Don’t worry about diving into the nitty-gritty just yet—we’ll break it down as we go.
On the left, you’ll see your BodyGraph. It’s a little diagram that vaguely resembles a human figure and represents how you give and receive energy. The BodyGraph highlights your natural strengths, areas for growth, and the unique role you’re here to play in the grand design of the universe.
You’ll also notice two boxes on either side of the BodyGraph. These hold even more fascinating details about how you’re wired.

The lighter boxes on the left of your chart represent the planetary positions by neutrinos passing through you 88 days before you are born, which imprints you with your unconscious traits. Revealing elements of your subconscious design—those underlying tendencies and traits that influence you, even if you’re not fully aware of them.
The darker boxes on the right, on the other hand, show the planetary positions at the exact time of your birth. These highlight your conscious mind—your personality traits and characteristics you’re likely familiar with and recognize in yourself.
Together, these conscious and subconscious elements weave together beautifully to create the unique and magnificent you.
Take a deep breath in… hold it for a moment… and let it all out. Alright, ready? Let’s keep going!
There Are 5 Human Design Types
The five types are written in the language of Quantum Human Design™ and traditional Human Design are the Initiator/Manifestor, the Time Bender/Manifesting Generator, the Alchemist/Generator, the Orchestrator/Projector, and the Calibrator/Reflector.
You can find your Type at the bottom or the side (depending on which software you use) of your Human Design chart in the Keynotes.
Each of the five personality types has a unique strategy for making decisions and being in the world. Knowing your type can help you develop confidence and trust in your capacity to make reliable decisions for yourself.
Manifestor / Initiator
Manifestors are here to get things started. They have unique bursts of intense energy that are followed by equally intense periods of rest. Manifestor’s intensity is felt by everyone around them and inspires change in the lives of those they come in contact with.
Generator / Alchemist
At 35% of the population, Generators are here to get stuff done. Generators are here to respond to the needs of the world and their seemingly endless energy is perfect for making real change.

Manifesting Generator / Time Bender
If Generators are here to get stuff done, Manifesting Generators are here to get a little bit of everything done. Generators tend to be focused in one area while Manifesting Generators are good at a little bit of everything. They are trailblazers and inspirational to those around them.
Projector / Orchestrator
At 20% of the population, Projectors are here to guide the world. Projectors have a unique and intense gift of being able to truly see those around them and offer meaningful advice.


Reflector / Calibrator
Representing less than 1 percent of the population, the Reflector is the rarest of the Human Design types. The Reflector is a truly unique, unusually sensitive person who must be in the right place with the right people to experience true happiness.
First and foremost, always refer back to your type. Your type is the core of your design and everything stems from there.
The next piece is your type’s Strategy.
Strategy
In Human Design, each Type has its own unique Strategy. Your Strategy is like a guidebook for how the best opportunities in life will naturally find their way to you. It helps you understand what actions (or non-actions) you need to take to ensure you don’t miss out on what’s meant for you.

The strategies – inform then initiate, wait to respond, respond-envision-inform-then act, wait for recognition and invitation, and wait for a full lunar cycle – correlate directly to your Human Design type: Manifestors, Generators, Manifesting Generators, Projectors, and Reflectors.
Each strategy is intricately tailored to the unique energy dynamics of each Human Design type, ensuring that choices align harmoniously with individuals’ natural inclinations and energetic capacities.
The Manifestor’s Strategy: Inform
The Manifestor’s strategy is to inform others of their actions. A powerful Manifestor can soften the impact of their energy, and harness it to serve themselves and others by taking note of all the people who will be impacted by their actions and then tell them what to expect.
The Generator’s Strategy: Wait to Respond
The Generator’s primary motor is the Sacral Center, which does not have initiating energy, the Generator’s strategy is to wait to respond. The Generator will feel pressured to initiate and follow through, but in reality, their strength is on the follow-through only, not the initiation.
The key to keeping a Generator’s energy sustainable and breaking out of the conditioning field is to respond. The positive response of the Sacral turns it on and gives the Generator the fullest possible access to the Sacral energy.
Generators are the only type who can find clarity simply by responding to yes or no questions. If you are a Generator, ask someone you trust to sit down with you and ask you a series of yes or no questions about a situation you may be wrestling with. This will help you access your deep self-awareness in an easy and joyful way!
The Manifesting Generator’s Strategy: Respond-Envision-Inform-Then Act
Manifesting Generators should try on ideas in their imagination first and visualize the outcome. Then, they must wait before taking action. Manifesting Generators must also inform like Manifestors in order to stabilize the energy around them. They can go so fast that informing feels as if it is slowing them down, but informing will decrease the resistance that they feel from others.
The Projector’s Strategy: Wait to Be Invited
Projectors can have the hardest time in life when they don’t understand their type and their strategy. The Projector’s strategy is to wait to be invited. The waiting for the Projector is about big invitations, such as love, career, and living conditions.
The Reflector’s Strategy: Wait a Full Lunar Cycle
Reflectors are lunar beings. The moon makes a complete cycle through each of the sixty-four gates every twenty-eight days. As the moon moves through the chart of a reflector, it brings with it consistent changes in definition. Because of these consistent changes, a Reflector can anticipate energetic and decisive days based on their lunar cycle. The Reflector’s strategy is to wait twenty-eight days (the cycle of the moon) to make a decision
Following your Strategy is incredibly simple and incredibly difficult to implement. Hold some safe space for the areas of yourself that feel uncomfortable with this information and I’ll check back in late in this article.
Authority
By now, you know your Type and Strategy. Your Strategy guides you toward the right opportunities, but here’s the catch—not every opportunity is meant to be a yes.
That’s where Authority comes in. In Human Design, your Authority is one of the most crucial keys to understanding how you’re designed to make the best decisions for you.
For most of our lives, we’re taught to “trust our gut” or rely on logic, like creating a Pro/Con list, to make big decisions. But here’s the thing—what if your gut or your mind isn’t the place where your best decisions come from?
Each person has a unique Authority that acts as their internal GPS, guiding them toward the choices that truly align with their authentic self. Trusting your Authority means trusting yourself, allowing you to access the wisdom within and make decisions that feel undeniably right for you.

Emotional Authority / Creative Authority
When you have a defined Emotional Solar Plexus, it will dramatically influence your strategy. The defined Emotional Solar Plexus is a motor with energy that pulses in waves. If you have Emotional Authority, you probably know that you have moods or changes in your emotional energy pretty regularly. It’s pretty common for emotionally defined people to be terrified of making decisions.
They often have a history of enthusiastically leaping into decisions and then waking up a few days later only to find that their mood has shifted and now they are obligated to finish a project or a relationship that they just aren’t in the mood for any more. Understanding emotional authority will help you make better choices and significantly improve your chances that your mood won’t affect your commitments.
If you have a defined Emotional Solar Plexus, you are not here to be spontaneous. Be careful of others who will often put pressure on you to leap into things. Leaping into things without waiting for clarity will only create chaos in your life if you have emotional authority.
When you have emotional authority in your chart, you still use your strategy, but you need to wait until it feels right.
Sacral Authority / Evolutionary Authority
Sacral Authority means that you have a defined Sacral Center and that there are no additional energies influencing your Sacral. Your Sacral is the only decision-making center in your chart, and your Sacral response in the moment is the correct authority for you at any given point in time.
Spleenic Authority / Actualising Authority
The spleen is the center for survival, time, health, and intuition. Because it is the energy for basic survival, it is very time-centered and always operates with an intuitive pulse in the moment. You trust your gut and act on it. This is pretty easy for Manifestors and Projectors, but sometimes it can be confusing for Generators, who may wonder if their spleen overrides their Sacral response. For Generators with splenic authority, their Sacral response in the moment is correct. Your spleen and your Sacral work together.
Ego Authority / Resource Authority
Only Manifestors have ego authority. Ego authority is when your Will Center is connected via a colored channel to your Throat Center. With ego authority, you don’t have to wait for anything before you take action.
The one caveat with this is making sure that you are well-rested and ready to take on the world. A defined ego is designed to have cycles of work and rest. It’s easy with the willpower of the ego to push through to burnout and damage your health. If you have ego authority, check in with yourself to see if you need some downtime before you leap into the next commitment.
Self-Projected Authority / Orchestrated Authority
Only Projectors can have self-projected authority. Self-projected authority comes from a channel connecting the Identity Center to the Throat Center with no other overriding energies defined in the chart, such as the Solar Plexus or the Spleen.
Self-projected authority means that you have to “see” your decisions reflected or projected through others to get clarity. In order to really know what is correct for you, you need to have a circle of close friends who you can talk to about your choices. You need to hear yourself talking to others and see their response to know whether something is correct for you or not.
Mental Authority
Mental Projected Authority is also only experienced by Projectors with a defined Ajna to the Throat Center and no other overriding energies. Mental projected authority, just like self-projected authority, means that you have to talk to other people to get clarity about which invitations are right for you.
Lunar Authority
Reflectors are the only type that has Lunar authority because they don’t have any definition in their charts. It is vital for a Reflector to allow a full lunar cycle to pass (28 days) before they make any decisions.
During the Lunar Cycle, the change in energy will allow the Reflector to sample energy from other authorities, and only then can they come to the right decision for them. It would be very helpful for Reflectors to track the transits when they are making a life-changing decision.
Strategy and Authority: The Perfect Pair
Your Strategy and Authority are the dynamic duo of Human Design—they go hand-in-hand to guide you toward a life of alignment and flow.
While Human Design can feel intricate, the beauty is this: if you focus solely on following your Type’s Strategy and Authority, you’ll naturally begin living in harmony with your design.
Strategy is your unique approach to navigating life. It’s how you’re designed to interact with the world and attract the opportunities that are meant for you.
Authority is your inner guidance system, your personal decision-making tool. Determined by your Human Design chart, your Authority helps you make choices that align with your authentic self, acting as a compass that points you toward your best life.
Together, Strategy and Authority create magic. Strategy brings you to the table of life, and Authority helps you choose the most delicious, nourishing dish it has to offer.
A Quick Check-In
By now, you know your Type, your Strategy, and your Authority. If you pause here and focus on following just these three principles, you’ll begin to notice incredible shifts. Life will feel more aligned, opportunities will flow your way, and you’ll make decisions that truly resonate with you.
And here’s what’s likely to happen next: as you embrace this way of living, you’ll find your life blossoming in ways you never thought possible. Over time, you may begin to notice patterns—positive or negative feelings that arise as you live your design.
These patterns are called your Signature and Not-Self Theme. Each Human Design Type has its own Signature and Not-Self Theme, serving as signposts to let you know if you’re on the right track—or if you’ve wandered off course.
Signature
In Human Design, your Signature is like the unmistakable feeling of being perfectly aligned with your true nature. It’s that dynamic sensation of “being in the flow,” where everything feels right and purposeful. But it’s not just about your personal fulfillment—your Signature also represents the unique contribution your energy brings to those around you. In some circles, it’s even referred to as your Higher Emotional Theme.
Think of your Signature as your personal blueprint. It reveals your natural traits, strengths, and the divine purpose you’re here to fulfill. Exploring your Signature offers a deeper understanding of the intricate design that makes you you.
Signature by Type:
Manifestor – Peace
Generator – Satisfaction
Manifesting Generator – Freedom
Projector – Success
Reflector – Harmony
Not-Self Theme
In your BodyGraph, you’ll notice areas of openness (white) and definition (colored in). The defined areas represent your life force—the energy that is consistently you and that you carry everywhere you go. Your open centers, on the other hand, are where you take in energy from the world around you. These open centers can be incredible sources of wisdom and power, but they’re also areas of potential vulnerability.
When you absorb external energy that makes you feel “wrong” or like you need to be something you’re not, you risk slipping into your Not-Self Theme (also known as your Emotional Theme). This happens when you veer off your path and away from your true nature.
Operating in your Not-Self often means trying to meet the expectations of others to gain recognition. It’s important to understand this isn’t a personality flaw—it’s part of being human. At a primal level, seeking acceptance and recognition feels like safety. But here’s the problem: when you’re recognized for living out of alignment with your true self, it’s not real recognition. It’s built on something that isn’t authentically you.
The antidote to the Not-Self is simple: follow your Strategy and Authority. By doing so, you anchor yourself in alignment and let go of the need to chase external validation. Instead, you’ll attract the right recognition for who you truly are.

Not-Self Theme by Type:
Manifestor – Anger
Generator – Frustration
Manifesting Generator – Frustration and Anger
Projector – Bitterness
Reflector – Disappointment
Embracing the Not-Self Theme
The Not-Self Themes aren’t something to shy away from—in fact, they’re powerful concepts that can transform your life once you approach them without judgment. When we open ourselves to the deep and complex wisdom these themes hold, we gain insights that are nothing short of magnificent.
Your Signature and Not-Self Theme act as navigational tools, guiding you inward to explore what’s really going on beneath the surface. These themes aren’t proof of failure or evidence of a problem. Instead, they’re clues—gentle nudges to pause, reflect, and recalibrate.
Even those “negative” feelings—frustration, anger, bitterness, or disappointment—hold tremendous value. By leaning into them and fully committing to experiencing the discomfort they bring, you create an opportunity for growth. These feelings aren’t signs that you’re doing life wrong; they’re signals that you’re engaged with life, not just passively going through the motions.
When your Not-Self Theme shows up, it’s often a reminder that you may be caught in the grip of social conditioning or pouring your energy into something that isn’t serving you. It’s an invitation to reflect, reevaluate, and take a bold step in a different direction.
Your Not-Self Theme isn’t a roadblock—it’s a signpost. It shows you where to begin looking within and when it’s time to make a greater, braver, and more aligned decision.
Profile
Everyone comes into the world with a specific Profile and purpose. The twelve Profiles describe the major life themes that you will encounter, and they illustrate another way in which your personality interacts with the world. Knowing your Profile can help you recognize some of these major life themes as you move toward fulfilling your life purpose.
Each number found in a Profile has a specific meaning. The first number in your Profile is the element of your personality of which you are consciously aware. The second number in the Profile may be unconscious and more hidden from you.

What is Your Human Design Profile?
Your Human Design Profile is the role that you play in the movie of your life. It’s one of the biggest pieces of your Human Design blueprint and the one element that is most overlooked.
Where to Find Your Profile on Your Human Design Chart
Your profile will be a set of two numbers that is a combination of the lines following the planets of your conscious sun and earth and your unconscious sun and earth. Do the Gate appears first with a full stop and then the Line.

In the chart above we see the conscious sun is in gate 41 and the earth is in gate 31. Both are followed by the line 4 so this is the first profile line we’ll see in this chart.
The unconscious sun is in the gate 44 and the earth is in gate 24. Both are followed by the line 1 so this is the second profile line we’ll see in this chart.
Therefore, this person is a 4/1 profile.
Look at your own chart or the chart summary and find your profile.
If you think of your life as a movie, your profile is the character you play.
These lines create a differentiation in the way that people with the same type will show up in the world. It makes your chart so much more individualized as each line has a theme.
More details about PROFILES in another post HERE.


Line 1: The Investigator | Resource
The Investigator needs information and feels safe when they have sufficient data. (The internet was created for Line 1 Profiles.) That is me all the way - probably helps that I fell into data analyst roles effortlessly !
Line 2: The Hermit | Responder
Line 2 Profiles need alone time to integrate experiences and to reset their energy. The Hermit needs space to feel good and grounded. There is a certain magic to having a Line 2 in your Profile. Once you have taken time away, it’s almost as if other people energetically perceive that you are ready to be invited out to do things and be a part of the community again. Your friends and family seem to always find you when you hide and will call you back out into life.
Line 3: The Martyr | Explorer
The Martyr must experiment with their ideas and be allowed to make mistakes without judgment. There’s no getting it wrong for the Line 3 Profiles, only figuring out what works based on their understanding of what doesn’t work.
Line 4: The Opportunist | Stabilizer
The Opportunist builds a foundation of friendships and needs to network as well as share. Line 4 Profiles need people to accept them for who they are; they need to know what’s next and be prepared to feel safe. (Line 4 Profiles don’t handle being in limbo well.)
Line 5: The Heretic | Visionary Leader
The Heretic is here to teach whatever they’ve experienced in life. They are considered karmic mirrors and are often subject to the projections of others. It’s through relationships with Line 5 Profiles that others discover what they need to heal the most within themselves. Line 5 Profiles need to trust that you will see the truth about them to feel safe, and they sometimes hide their truth very deeply when you first get to know them.
Line 6: The Role Model | Adept
The Role Model literally models for others what they are here to share and give the world. Line 6 Profiles need to “walk their talk.” They travel through three distinct life phases:
The first phase (birth until age thirty) is a youthful phase of experimentation and experiential learning.
The second phase (ages thirty to fifty) is a long cycle of healing, growth, and studying.
The final phase (over fifty) is a cycle of living what they’ve learned. Line 6 Profiles need to feel that what they are participating in is worth their effort in order to find meaning and energy in life.
The 12 Human Design Profiles

The 1/3 Profile: Investigator/Martyr | Resource/Explorer
Both the 1 and the 3 lines are in the lower trigram, so there will be an intense focus on your internal processes throughout life. You are naturally very skeptical and you can always detect a lie. The 1/3 Profile needs to investigate and study. Don’t be too cautious though – allow yourself to experiment. The Investigator energy of the 1 takes control, and you are scared to experiment because you feel like you aren’t ready. Let your experiences be your teacher so you can find out what truth really means for you.
The 1/4 Profile: Investigator/Opportunist | Resource/Stabilizer
The 1/4 Profile is very rare. The 1 brings a depth of knowledge and a longing to deeply investigate the things you are passionate about. Alone time is important for making sense of your knowledge. Being in a community with people who respect your knowledge, will naturally create an environment in which you share your discoveries. You will become an authority on what you have mastered when you find the correct people to surround you in your network.
The 2/4 Profile: Hermit/Opportunist | Responder/Stabilizer
There is tension between the 2 and the 4 – you’re never quite sure if you want to be alone or if you want to be out among your community. It’s important for you, as a 2/4 Profile to create a peaceful environment for rest. This space must be where you can go deep into your internal processes to get the rest you need.
It is equally important for you to develop a safe and welcoming community of people who will see your natural gifts. Your gifts and talents are so inherent you are unable to see them yourself. This is why you’ll need people you trust to draw them out of you.
The 2/5 Profile: Hermit/Heretic | Responder/Visionary Leader
The 2/5 Profile leads people to project onto you and expect your particular natural talents to come to their rescue. It’s important for you to decide what you really want to spend your time and energy on, and then decide what to say yes to and what to say no to. Use your strategy and your alone time to tune inward and get to know what’s aligned with your authentic self’s desire.
The 3/5 Profile: Martyr/Heretic | Explorer/Visionary Leader
As a 3/5 Profile, you are a catalyst for change and, for better or worse, people like to live vicariously through you. It can be difficult for you when you’ve experimented and “failed” after everyone has been projecting their plans onto you and holding you to their expectations. Embrace life’s ups and downs, and the inherent messiness of life regardless of what people think. You will draw the correct people to you in the end. When you get into this energetic flow, you’ll have some of the most magnetic energy of all the Profiles.
The 3/6 Profile: Martyr/Role Model | Explorer/Adept
For the 3/6 Profile, the first part of your life is all about experimenting. When you reach the end of your Saturn return you will begin to operate as a 3/3. After the age of 30, you may find more contrasting thoughts within yourself. Do you want to continue to experiment? Do you want to turn inward and settle down to hone in on your passions? You may be unsure.
It is okay to ask for space when you need it to let your inner voice speak to you. Learn to love and appreciate the chaos of life – it’s your greatest teacher. Learn to forgive yourself for mistakes and recognize the wisdom that comes from them. When you do, others won’t be able to ignore your wisdom in the later years of your life.
The 4/1 Profile: Opportunist/Investigator | Stabilizer/Resource
You are true to your innermost self. You have a strong moral compass which allows you to stick to your truth, and share the findings of your investigations about life with your close community. You may be known for externalizing everything you take in, but don’t let anyone stand in your way.
Remember as a 4/1 Profile you can always take your time when you are changing things up there is no rush. When it feels like you’ve lost touch with your passion, or identity, always go back to the important energy of your sun gate.
The 4/6 Profile: Opportunist/Role Model | Stabilizer/Adept
Your whole life is about your external world, but you still have a personal karma so it’s okay for you to be absorbed in your process. For your first 30 years as a 4/6 Profile, there will be a lot of experimenting; particularly with interpersonal relationships. You experience a push and pull between wanting to be among your community and wanting to be alone.
This internal conflict can be very challenging for you. You have a fear of rejection and it’s important not to seek external validation you crave. Settle into who you are with the people you love and respect.
The 5/1 Profile: Heretic/Investigator | Visionary Leader/Resource
You want to be a hero. You want to go to the depths of your knowledge base and offer it up to everyone. You love the process of learning, change, new projects, and challenges. 5/1 Profiles aren’t afraid to go against the grain if they need to. You have a magnetic quality that draws people in who want to know what you have to offer.
There is a chance that others will project onto you, which can feel like a lot of pressure, especially if people have expressed disappointment with you in the past. Following your strategy and learning to say no will help you avoid bitterness. Keep asking questions, becoming an authority on what lights you up, and owning who you are.
The 5/2 Profile: Heretic/Hermit | Visionary Leader/Responder
By design, as a 5/2 Profile, you are internally motivated and you are here to share what you know with the world. You must discover your own genius and the inherent gifts you want to release into the world. Others might not see your inner hero right away because you often hide your gifts and knowledge. If the world hasn’t “discovered” you yet, work on honing your own abilities through experimentation and interactions with others.
If you wait for others to recognize you you may become bitter, angry, frustrated, or disappointed. Ask yourself: where are you separating yourself from others? Are your expectations of others too high of a standard? What is it that you are good at? How can you recognize yourself more? It’s okay to put yourself out there.
The 6/2 Profile: Role Model/Hermit | Adept/Responder
Prior to your Saturn return, the 6 line operates as a 3, so everything will be about experimenting and letting life be your teacher. Trial and error is your process, even if your 2 line sometimes wants to retreat following a failure.
After 30 years old, there can be a time of deep retreat and aloofness. This time is for deep healing from the pain of your experimental years and a time for going inward to deepen your skills and self-understanding. When the time is right, others will recognize you for your wisdom and come to draw you out of the depths of your process. As a 6/2 Profile, don’t resist this, you were born to be a wise role model in this lifetime.
The 6/3 Profile: Role Model/Martyr | Adept/Explorer
Like the 3/6, for the first 30 years of your life, you’ll operate as a 3/3. These years are full of experimentation with the world around you and your internal self. The experimentation might slow down after your Saturn return, but never really ends. You may feel restless like you are forever searching for the missing piece.
It’s important to forgive yourself, and life, for not being perfect and to stay hopeful. Your 6/3 Profile means that responsibility and deep wisdom come naturally to you. Learn to balance the structure of what you’ve learned with the natural ebbs and flows of being human.
How Your Profile Shapes Your Life
Your unique Human Design Profile plays a key role in how your energy flows through the world and how others perceive you. It’s like a blueprint that blends the conscious and unconscious aspects of your design, creating a one-of-a-kind energy signature that guides how you navigate your life’s journey.
Simply understanding your Profile numbers can unlock powerful insights. They can help you make sense of core inner dilemmas, while also offering clarity on your ideal way to approach change, build relationships, learn, and manage your energy and influence.
Your Profile is more than just numbers—it’s a map that reveals how you’re wired to move through life with purpose and authenticity.
Centers
Centers may be one of the most fascinating pieces of your Human Design. In Human Design there are nine energy centers that may be defined or open. The way that your centers are defined, or open, are the building blocks of your type and authority. The configuration of the Centers in the chart tells you about how your energy works in the world, what you’re here to learn from others, and what you’re here to give to the world

Your Defined Human Design Centers
Defined centers have fixed and consistent energy. This energy will always be there for you and radiates out to impact others. Defined centers have their own issues, but in general, they are much easier to deal with than the sometimes traumatic experiences of open centers. To live out the beauty and the deep impact of your defined centers, you have to live your Human Design strategy. It will empower you to always know what to do.
Your Undefined Or Open Human Design Centers
Open centers are white, undefined, and mutable. The energy here is inconsistent and depends on your environment and mood. Understanding your open centers will empower you to work with your energy instead of being victimized by the energy you take in.

Want a copy of my Cheat Sheet?
Gates
In the Human Design system, there are 64 Gates, each representing a specific energetic theme. These Gates offer deep insights into your personality, what drives you, your life purpose, recurring relationship patterns, creative fulfillment, how your intuition operates, and even how you connect with Source energy.
Like all aspects of the chart, each Gate carries both a high and a low expression. As you explore the Gates in your chart, take a moment to reflect on how that energy might be influencing your life.
We are designed to be joyful, connected, creative, abundant, and powerful. When you align with the highest expression of the energies in your chart, life begins to flow effortlessly, and its magic unfolds in the most beautiful and natural ways.
Gates are located in both sides of the BodyGraph aligned with all the planetary symbols as shown in the image above. Gates don’t make much sense without looking at the Mandala. Below you will see the gates, numbered to 64 in the sequence of the Hexagrams. When reading the Mandala the gates flow in an anticlockwise direction.

Planets
The planets, in the boxes that flank your Bodygraph, are connected to your Gates. Your defined Gates are represented in these boxes.
If a Gate appears in the black/right column, it represents aspects of your conscious personality. You will recognize these parts of yourself.
If a Gate appears in the red/left column, it’s part of your unconscious. Your unconscious is still a part of your design but you may not recognize these aspects.
The same Gate can appear in both of the columns, and the same Gate can appear multiple times within the same column.
You’ll notice that there is a symbol next to each Gate number in the columns.
Each of these symbols represents a planet and provides information about how the energy of this specific Gate may show up in your life.
Channels & Circuitry
When you look at your BodyGraph, you’ll see the nine Centers connected by various lines. These lines are called Channels, and there are 32 of them in total. The color of a Channel provides insight into your personality and how its energy expresses itself:
Black (or burgundy): These Channels represent traits you’re consciously aware of—they’re the aspects of your personality that you can easily identify.
Red (or tan): These Channels represent traits that operate on a subconscious level. You may not be fully aware of these, but they still shape your energy and actions.
Checkered (black and red): These Channels are a blend of conscious and unconscious traits, bringing together both sides of your energy.
White (undefined): These Channels represent open Gates, meaning you take in energy from the world around you in these areas. How this energy expresses through you will depend on your environment and the people you’re interacting with.
Your energy is constantly in motion, and Channels are the pathways that allow it to flow between your Centers. These dynamic connections reveal how your energy interacts with the world and helps you better understand how you’re wired to operate.
Human Design Circuitry
We all have a purpose in our communities. If we are to survive as a species we have to grow and change. We have to use logic and reasoning to make decisions, and we have to communicate with each other. Now, just as all Human Design types have a strategy, all humans have a circuit that tells them how they are contributing to humanity and how they will best serve the greater good. This is for an advanced lesson, more on that later.
Incarnation Cross
In The Definitive Book of Human Design, Ra Uru Hu describes the Incarnation Cross this way:
“Our Incarnation Cross isn’t something that automatically emerges as we go through our deconditioning process, nor does it provide instant gratification…when we function as our differentiated self in the world, our cross literally but quite naturally takes over our life…we don’t awaken to our cross, we awaken in it.”

The Incarnation Cross is composed of the energies from your conscious and unconscious Sun and Earth signs—the top four black and red numbers in your Human Design chart. These four energies make up about 70% of your personality expression, and together, they form the foundation of your life purpose. Your Incarnation Cross is essentially a map of who you are, what drives you, and the ultimate destiny you can step into if you choose.
Each Incarnation Cross is a unique blend of the four Gate energies that comprise it, with the conscious Sun Gate—the top black number on the right—being the most significant. This energy acts as the focal point, filtering and expressing all the other energies in your Cross, as well as the rest of your chart.

Over the course of a year, the Sun moves through all 64 Gates, resulting in 192 possible Incarnation Cross combinations, each tied to the Sun and Earth transits at the time of your birth. Unlike a simple Sun sign in astrology, your Incarnation Cross provides a profound and detailed understanding of your soul’s path and the journey of your lifetime.
Variables (Arrows)
Your variables guide you on how you are designed to absorb, process, and learn information which leads to how your perspectives are shaped. Variables can be extremely helpful in understanding your not-self and how to best decondition from societal expectations.
Your variables guide you to the true nature of your awareness. They show where you are decisive, attentive, and vibrant by nature, and where open, peripheral, and tolerant. Essential aspects of your variable include the best environments and nutritional guidelines for your unique design.

Left-facing Arrows
Think of left-facing arrows as pointing to the traditional view of left-brain thinking, or masculine energies. Structured, logical, or precise.
Right-facing Arrows
The right-facing arrows are the traditional view of the right brain or feminine energies: emotional, open, or fluid.
Human Design Variable #1: Digestion
Human Design Variable number one is for digestion and this is the top left arrow of your chart. Digestion refers to how we take in information and how we set routines.
Left-facing Digestion Variable Arrow
You benefit from having structure and consistency in your everyday routines. When you have a regular schedule and know what to expect ahead of time, you flourish and feel more empowered to face the day. You’re also someone who probably has no problem eating the same thing repeatedly. Lean into developing routines and timetables for yourself; this is beneficial for you. You can also take in and assimilate a great deal of information.
Right-facing Digestion Variable Arrow
You don’t need to follow a set, predictable pattern or timetable. You can mix things up every day and make room for greater flexibility in your schedule so that you can approach things with a more flexible mindset. You enjoy experimenting with your food, so feel free to try a variety of things. Take your time when learning and taking things in so that you may properly absorb them. You absorb knowledge in a broader, more generalized manner.
Human Design Variable #2: Environment
The second Human Design Variable is for environment and is the arrow on the bottom left. This variable represents physical spaces and the consistency in which we use routine.
Left-facing Environment Variable Arrow
You perform best in a predictable setting. You probably enjoy going to the same places each day to sleep, eat, and work. When you visit a new place, you need some time to get comfortable with your surroundings and truly get to know them before going on to something else. Enjoy the consistency of going to the same places and sticking to what works because this is probably how you will feel the most comfortable.
Right-facing Environment Variable Arrow
You like having options for where you spend your time and variation. It’s beneficial for you to travel and spend time in various settings, changing where you work and how you conduct yourself on a daily basis. While maintaining discipline in your daily plans and routines, try not to be overly strict about it. Allow yourself some freedom and movement, and explore various settings and activities to see what appeals to you.
Human Design Variable #3: Awareness
Variable number three is for awareness of how we learn and understand information. This arrow is on the top right.
Left-facing Awareness Variable Arrow
What works best for you is to pay attention to details, nuances, and getting granular with how you process information. You should fully immerse yourself in the information since this will help you remember it better and make it easier for you to recollect and explain it to others. You learn best by paying attention to what is right in front of you and keeping your head down.
Right-facing Awareness Variable Arrow
You normally view things in a “big-picture” way. You want to zoom out and take everything in at once, and you approach learning in a way that is more fluid and free-flowing, without needing to be overly rigid or detailed with how you process knowledge. You have a talent for recognizing overarching patterns and connecting ideas in a way that no one else can. Give up on the more conventional educational approaches and study things in a way that allows you to interpret and make sense of them.
Human Design Variable #4: Perspective
On the bottom right is the fourth Human Design variable. The fourth variable represents perspective and how we set goals and approach manifesting our wants and needs.
Left-facing Perspective Variable Arrow
Your specialty is creating thorough plans and establishing clear goals. Release any guilt or criticism you may feel for being detailed and very clear about what you want in life. You get your ideas through writing them down and outlining your aims and dreams, therefore don’t be shy about putting your intention into the Universe in this manner. You’ll probably benefit from incorporating strategy, using company planning, and defining precise goals.
Right-facing Perspective Variable Arrow
You don’t place as much emphasis on the specifics of your objectives or ambitions. It’s better for you to concentrate on the emotions associated with obtaining or receiving those goals. In your career, how do you want to feel? Home? regular life? It’s okay to just have a rough notion of what you want; there’s no need to create a specific strategy or roadmap outlining how you’ll get there. Just having a general sense of what you want is sufficient.
Putting It All Together: The 5-Step Process to Read Your Human Design Chart
We have just barely scratched the surface of the deep wisdom in your Human Design chart. I hope that this overview filled you with knowledge and gave you some touchstones for your journey.
Here is a quick recap of how to approach your chart:
Step 1: Build the Foundation
Focus Areas: Type, Strategy & Authority
Begin with the essentials: your Type, Strategy, and Authority. If you take away just one concept from Human Design, let it be this. These elements act as your internal GPS for making aligned decisions. Master these, and the rest of your chart will naturally fall into place with ease.
Step 2: Understand How Your Energy Flows
Focus Areas: Centers & Definition
Next, familiarize yourself with your defined and undefined Centers and how they interconnect (your ‘Definition’).
Defined Centers: These are areas where you possess consistent energy and influence over others. They often represent your reliable strengths.
Undefined or Open Centers: These are areas where you are more flexible but also more susceptible to external influences and your environment.
Definition: Determine whether all your Defined Centers are interconnected or if there are separate parts operating independently. Assess if you process things solo or benefit from external input to connect the dots in your thoughts and feelings.
Step 3: Explore Your Role and How You Relate to Others
Focus Areas: Profile, Lines, Circuitry, Incarnation Cross
Examine your Profile, Circuitry, and Incarnation Cross to understand your natural role in life.
Do you excel by deep research before action or through trial and error?
Are you more influential within close circles or among strangers?
Are you meant to focus on self-growth or to share wisdom with others for societal advancement?
Understanding these aspects enriches your self-awareness and helps you navigate your roles and relationships with clarity and purpose.
Step 4: Dive Into the Details That Make You, YOU!
Focus Areas: Channels, Gates, Planets
Now, delve into the Gates, Channels, and Planet activations in your chart. This is where you uncover the intricate details—your strengths, weaknesses, habits, and tendencies.
By recognizing your consistent traits and how these energies manifest in your life, you can appreciate your unique qualities, stop comparing yourself to others, and confidently embrace the person you were designed to be.
Step 5: See the Big Picture: Identify Themes in Your Human Design Chart
Focus Area: Entire Chart
Don’t worry, I’m here as a Quantum Human Design Specialist to guide you on your journey.
I invite you to get your free chart right here, and there’s tons of info out there about Human Design. If you interest is in studying Quantum Human Design — Karen Curry Parker is the queen bee and a great place to start.
Jac x


